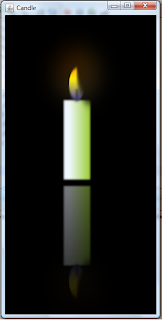
I was really amaze how easy playing JavaFX using Netbeans 6.5 IDE. I build a simple candle with fire , a fire radiance and the candle reflection. After spending almost 3 hours it was then finnish, as i look at it. I think I should uninstall my Adobe Photoshop CS 3 and doing graphics on JavaFX instead (joke! hehehehek). Yes indeed its really easy and fun scripting on JavaFX, the Netbeans IDE 6.5 also has already a lot HELP for the API and sample of it.
so heres my simple candle.
This is how it is done.
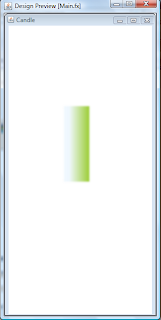
1. Lets create the body of the candle or its trunk. We will going to use the javafx.scene.shape.Rectangle for the trunk and javafx.scene.paint.LinearGradient API to fill color on its trunk. Wel have to use the javafx.scene.effect.GaussianBlur effect to make the trunk more realistic, it also make the edge of the candle more smooth.
var candlebody = Rectangle {
x: 50 y: 100
width: 50 height: 150
fill: LinearGradient { startX: 0.0 startY: 0.0
endX: 1.0, endY: 0.0
proportional: true stops: [
Stop { offset: 0.2 color: Color.ALICEBLUE},
Stop { offset: 1.0 color: Color.YELLOWGREEN} ]
}
effect: GaussianBlur { radius: 5 }
}
preview below:
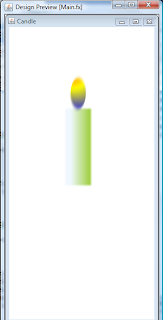
2. Lets create the fire and bind it to the trunk so that if we change the X and Y coordinate trunk the fire will follow its position. We'l going to use the shape javafx.scene.shape.Ellipse and we fill it using javafx.scene.paint.RadialGradient to evenly color the fire and then we wel use the javafx.scene.effect.MotionBlur to give a fire effect.
var fire = Ellipse {
centerX: bind candlebody.x + 25 centerY: bind candlebody.y - 30
radiusX: 15 radiusY: 30
fill: bind RadialGradient{centerX: 80 centerY: 50
focusX: focusY: 10
radius: 60
proportional: false
stops: [Stop { offset: 0.3 color: Color.ORANGE},
Stop { offset: 0.5 color: Color.YELLOW},
Stop { offset: 1.0 color: Color.BLUE},
] }
effect: MotionBlur { radius: 10 angle: 100 }
}
preview below:
3. Lets create the candle thread on top of the candle trunk and make it look like it burns. wel going to use the javafx.scene.shape.Rectangle for the thread and use the javafx.scene.effect.GaussianBlur effect to look like it is burning.
var candlethread = Rectangle {
x: bind candlebody.x + 23 y: bind candlebody.y - 20
width: 3 height: 20
fill: Color.BLACK
effect: Bloom { }
effect: GaussianBlur { radius: 6 }
stroke: Color.GRAY strokeWidth: 2.5
strokeDashArray: [1.0 .. 5.0]
}
preview below:

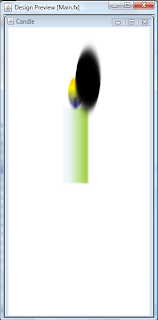
4. To look our fire more realistic, we going to make it an crescent like shape. we wil cover a part of fire with javafx.scene.shape.Ellipse and we are going to use the javafx.scene.effect.MotionBlur effect to get the blurry edges. Of course we will bind it to the fire centerX and centerY coordinate.
var firereshape = Ellipse{
centerX: bind fire.centerX + 25 centerY: bind fire.centerX - 30
radiusX: 25 radiusY: 60
effect: MotionBlur {
radius: 25 angle: 100 } }
preview below:
5. We are going to enhance the flame or the fire. we will make a radiance, in order for us to see the flame radiance we will turn/fill the scene into dark or black color.
Stage {
title: "Candle"
width: 300 height: 600
scene: Scene {
fill: Color.BLACK content: [candle]
}
}
preview below: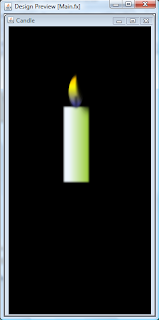
6. We then make the radiance using the javafx.scene.shape.Ellipse and the javafx.scene.paint.RadialGradient combining 3 colors stop orangedred, orange and white. We then use the javafx.scene.effect.GaussianBlur effect so that the color will spreadout. And then we will make the ellipse slightly transparent so that the flame will still visible using the inherited variable fro the node javafx.scene.Node named opacity and set the value to 0.2.
var fireradiance = Ellipse{
centerX: bind fire.centerX centerY: bind fire.centerX - 25
radiusX: 40 radiusY: 50
fill: bind RadialGradient{
centerX: 80 centerY: 50
focusX: 50 focusY: 10
radius: 60
proportional: false
stops: [Stop {
offset: 0.0 color: Color.ORANGERED},
Stop {offset: 0.5 color: Color.ORANGE},
Stop {offset: 1.0 color: Color.WHITE},] }
effect: GaussianBlur {radius: 60}
opacity: 0.2
}
7. We almost done with our work, lastly we are going goup the candle body variables and have an reflection effect using javafx.scene.effect.Reflection and use javafx.scene.effect.BlendMode set to BlendMode.MULTIPLY.
var candle = Group{
translateX: bind posx translateY: bind posy
blendMode: BlendMode.MULTIPLY
cache: true
content:[firewithradiance candlebody]
effect: Reflection {
fraction: 0.9 topOpacity: 0.5 topOffset: 2.5 } }
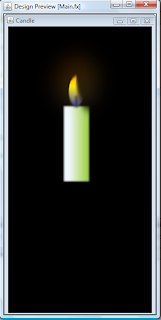
and we are Done. please browse the preview output above.
.
Im Proud to have a contribution on javapassion site. :0) thanks for the appreciation javapassion.
